Finite State Machine for an animal tribe behaviour

The purpose of this post is to show and explain my realisation of a simple State-based animal AI acting as one tribe with different states played.
As a brief start, I would say, that the idea of this post is to help other programmers get the starting vector of understanding, before creating their own one.
I will not explain each line of code, therefore I will split my realisation into small parts with a screenshot of a class and a brief explanation of what is happening inside them. Also, at the end of this post, you can find a link to Git Repo with all project scripts explained below.
Animal Stats
Before starting this project, you need to plan which States and Actions you would like your animal prefab could do. As I had an idea of creating a full cycle of an animal lifetime, I decided to create: Idle state, Rest state, Eat state, Walk and Jump around the state and the final one is Move to next area state, which is triggered when you want your tribe to move to another location of your world.


On a screenshot mentioned above, you can see a serialisable class Animals stats, with a bunch of different settings:
- Animal speed, divided into different speed measures for each state;
- Animal time settings, those variables have minimum and maximum time to act in the current state.
- Patrol spawn points have 2 settings of an angle around an animal and offset distance when spawning a random patrol point around him.
In Methods on the second screenshot, I mainly generate a random time value and provide the result to a specified state each time at a different time measure.
Animal Controller


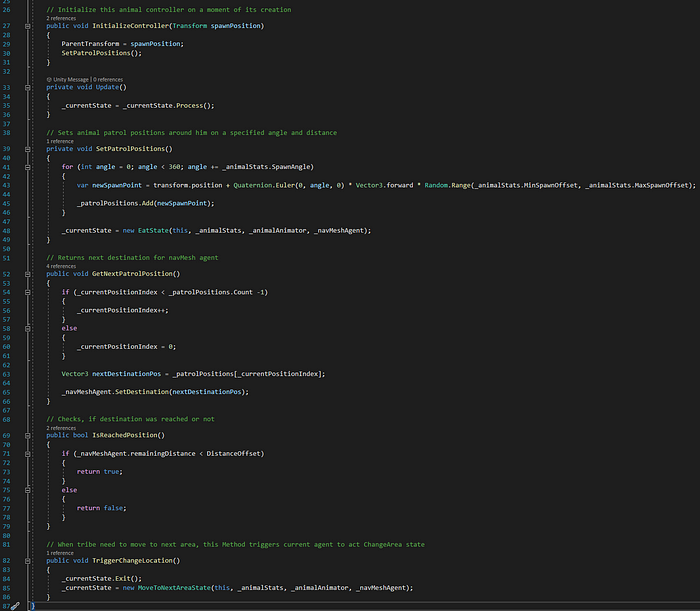
On the pictures above is a MonoBehaviour class which is placed over each animal prefab on the scene.
Also, all move abilities of an animal are realised with NavMesh Agent and visualised with Unity Animator.
So here we mainly reference Animal Stats class and those 2 components mentioned above.
When a current animal is spawned, we call several methods, first is to set spawn position, which we will use later to use as destination position for NavMesh Agent and second generates patrol positions around this animal with specified angle and distance offset.
Rest methods are mainly used for Walking and Jumping states, providing the next destination, when the previous one was reached.
TriggerChangeLocation method is used to send a callback to exit current state and start a new one to act location change state.
Base State Class


Here I mainly use Inheritance to create different states afterwards. Therefore I created a new abstract StateBase class. It mainly has 2 enumerators with state names and state Events.
Those events will trigger state changes allowing us to split them into 3 phases which we will cover later:
- Enter
- Update
- Exit
Here we need a constructor, which we initialise each time, when we need a new state, we mainly pass all needed parameters, used inside of inherited states.
Afterwards, we set 3 virtual actions and override them inside new states. Those actions are:
Enter — mainly runs one time, when we enter a new state. It allows us to initialise private parameters and set tasks, which will be operated in the next action.
Update — runs each update and operates the main logic of the current state. Here we check if we succeeded or failed in a certain task and set a new task, according to the result.
Exit — this action runs right before the current state is finished and starts a new randomly generated state. Here we clear all cached data and at some points clear the NavMesh controller, to avoid bugs in the next state.
To run the current state in MonoBehaviour Update, we use a method called “Process”. It always works with each frame and jumps between different event types.
Last but not least, we have a random generation of the next state. It is not perfectly made, has some hard code and not really the best idea of randomisation. It is probably better to create some kind of probability percentage check and set a new state according to the importance of percentage value.
And now I will slowly move to several types of states, which I use in the current project.
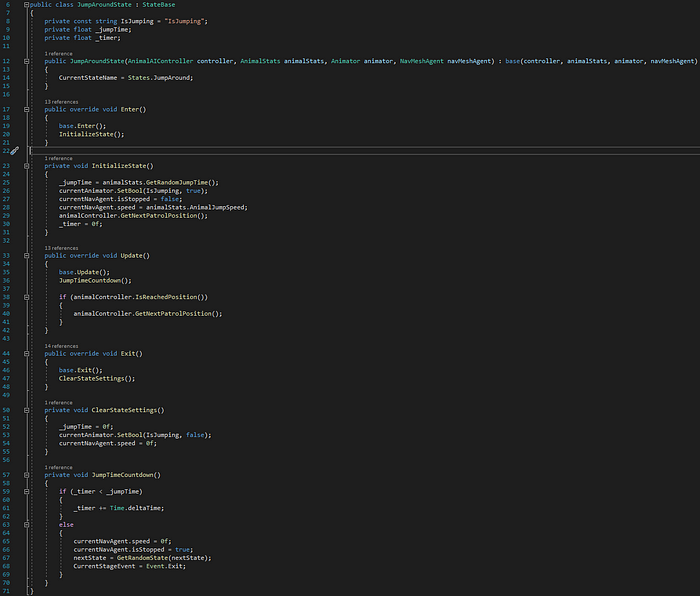
As we inherit each behaviour from a base state class, discussed earlier, the base concept of inherited members is the same. The only difference between them is the core concept of the state itself.
Idle State

Let’s start with first and simple behaviour as an Idle state.
Firstly, each state has its own animation, which we trigger by entering stage and cancel when we exit it. That is why each behaviour class has its own constant string of an animation name, to avoid name misspelling and follow code cleanliness.
After entering each state, we initialise local variables with time settings and the NavMesh agent controller. When we have clarified the scale of behaviour lifetime, we check if we have exceeded clamped behaviour lifetime and proceed to exit this state and entering a new one.
To sum up, I would say that each state, except MoveToNewLocation, has the same implementation of a lifetime.
Walk Around State

In this behaviour, we add new logic of moving around the current area, by following a path, which we set in the NavMesh component. As we have already initialised patrol positions before in AnimalAIController class, we access a list of target points by entering move behaviour and current AI moves towards the pre-defined destination with specified speed. Each time in an update we check if we have already reached a target or not and act responsibly on the result.
Jump, Eat and Rest States


These behaviours copy all states mentioned above with the only difference is a personal time and speed values from AnimalStats settings.
Move To Next Area State

This state is responsible to change the tribe area location. If you remember, in Animal Controller class we store animal spawn location, when we initialise it. So when the tribe decides to change the current location - all children objects, as well as animal spawn points are moved to a new location. Thus we can use this position, as a new target destination for our NavMesh agent and until we didn’t reach this location, all members of the tribe are in this behaviour. At the moment, when we have reached our destination, we return to the base animal lifecycle, until we trigger a new location update again.
Tribe Spawn Point

On the screen above you can see quite a simple class, which is assigned to all empty game objects on the scene, which we initialise as the centre of a tribe area. From this component, we can access transform location of the current spot and its status, either occupied or not. As I wanted to keep them private, I created 2 methods to modify the current location status from outside. The main purpose of this idea is to avoid a situation when 2 different tribes move to the same location.
Tribe Manager


The main usage of Tribe Manager is to control the diversity and population of the tribe.
To start we need to create a new empty game object and assign this script to it. Here we mainly create and control serialised fields to initialise current tribe settings. We provide prefabs of different animal objects, set the spawn angle and distance offset, and time values to trigger the change location method.
When we start this script, we initialise all tribe objects on the scene regarding newly created positions around the tribe leader accordingly.
Here we see 2 mostly the same methods, where we create and instantiate tribe members and cash their controllers into a List collection. This list we use later to inform all tribe members to act ”change location” behaviour.
In the ChangeLocationLoop coroutine, we create a basic life-time of a tribe at one location. When the time is up, we ask the tribe manager to go through the locations list and find the next free spot. When we get a new location, we move there our leader and as our leader is the main destination for all tribe members, we trigger them to follow a new path with a specified speed value.
Conclusion
To sum up, I would say that this idea is quite simple and easy for an extension. To add it to a new project, you just need to create empty game objects on the scene and adjust settings in Inspector.
As I promised at the beginning of this post, here is the link to Git Repo with the project mentioned above.
Also, if you are interested, add my Twitter to follow along with new publications.
Thanks for your time and attention.
